PostgreSQL v13 Installation on Ubuntu 18.04
02/10/2020 04:13 • ☕️ 6 min read
PostgreSQL, also known as Postgres, is a free and open-source relational database management system, which is extensible and SQL compliance. The initial release was 8 July 1996, and the new version 13 was released on 24 Sep 2020.
Installation
This installation is covering Ubuntu 20.04 and 18.04, which is a very frequent choice for AWS EC2 instances.
First, we need to check are vim, bash-completion and wget installed and up to date, following downloading and adding apt repository keys.
$ sudo apt -y install vim bash-completion wget

$ wget --quiet -O - https://www.postgresql.org/media/keys/ACCC4CF8.asc | sudo apt-key add -

$ echo "deb http://apt.postgresql.org/pub/repos/apt/ `lsb_release -cs`-pgdg main" |sudo tee  /etc/apt/sources.list.d/pgdg.list
Next, we need to update the package index, following by PostgreSQL installation.
$ sudo apt update
$ sudo apt install postgresql-13 postgresql-client-13
After the successful installation, we will get a message about the main server configuration settings:
Ver Cluster Port Status Owner Data directory Log file 13 main 5432 down postgres /var/lib/postgresql/13/main /var/log/postgresql/postgresql-13-main.log
During the installation, PostgreSQL service is started and set to start up after every system reboot.
We can check service status with the following commands:
$ systemctl status postgresql.service

$ systemctl status postgresql@13-main.service

$ systemctl is-enabled postgresql
enabled
Initial Configuration
Ubuntu user postgres that has the superadmin rights over the entire PostrgreSQL was automatically created during the installation part.
It is advisable to change postgres database user password immediately after installation by running:
sudo su - postgres
psql -c "ALTER USER postgres WITH PASSWORD 'P@sswr0d4PostgresUser'"
Optionally we should delete the history line that contains our password change history -d 1.
Then we can run SQL prompt by running:
$ psqlWhich will display a message similar to the following:
psql (13.0 (Ubuntu 13.0-1.pgdg18.04+1))
Type "help" for help.

postgres=#
Create DB and user for DB
To get connection details, type the following:
postgres=# \conninfo

You are connected to database "postgres" as user "postgres" via socket in "/var/run/postgresql" at port "5432".
Create a new database by typing:
postgres=# CREATE DATABASE dbexample;
-- CREATE DATABASE
Create a new user we can use coupled with the example database we just created above.
postgres=# CREATE USER exampleuser WITH ENCRYPTED PASSWORD 'MyExampl3UserPass';
-- CREATE ROLE
Next, we will grant all privileges on the example database to the newly created user. The original postgres user already has ownership and supper admin rights on all databases, so this new user we can fine-tune to the database needs.
postgres=# GRANT ALL PRIVILEGES ON DATABASE dbexample to exampleuser;
-- GRANT
List all databases
While in prompt type command \l
postgres=# \l
                               List of databases
   Name    |  Owner   | Encoding | Collate |  Ctype  |    Access privileges
-----------+----------+----------+---------+---------+-------------------------
 dbexample | postgres | UTF8     | C.UTF-8 | C.UTF-8 | =Tc/postgres           +
           |          |          |         |         | postgres=CTc/postgres  +
           |          |          |         |         | exampleuser=CTc/postgres
 postgres  | postgres | UTF8     | C.UTF-8 | C.UTF-8 |
Connect to Database
A connection with the database will be established with the default postgres user by executing the following command.
postgres-# \c dbexample
You are now connected to database "dbexample" as user "postgres".
If we want to connect with a different user we can type:
postgres-# \c dbname usernameConnect has a following signature:
\c or \connect [ -reuse-previous=on|off ] [ dbname [ username ] [ host ] [ port ] | conninfo ]Few additional commands that may be useful to know
| Commands | description |
|---|---|
| \d =table= | Show table definition including triggers |
| \dn | Listar Schemas |
| \df | List functions |
| \dv | List views |
| \df+ =function= | Show function SQL code |
| \x | Pretty-format |
To learn more, check the official documentation here.
Quitting PSQL prompt
Lastly, to quit prompt use the following:
postgres-# \qLinux equivalent commands
It is possible to achieve the above without using psql prompt by using equivalent shell commands:
postgres@ubuntu:~$ createuser exampleuser --password
postgres@ubuntu:~$ createdb dbexample -O exampleuser
postgres@ubuntu:~$ psql -l
Connecting to remote PostgreSQL from local machine (Win/Linux)
Frequent solution to connect to PostgreSQL database is to allow remote server by editing config file:
$ sudo nano /etc/postgresql/13/main/postgresql.conf # Listen on all interfaces
listen_addresses = '*'
# Listen on specified private IP address
listen_addresses = '192.168.10.11'After config has been changed, we will need to restart PostgreSQL service:
sudo systemctl restart postgresqlAt the end we need to check whether service listening on appropriate ports:
$ netstat  -tunelp | grep 5432

tcp   0   0   0.0.0.0:5432   0.0.0.0:*   LISTEN  111  112837  11143/postgres
tcp6  0   0   :::5432        :::*        LISTEN  111  112838  11143/postgres
PuTTY tunnel to EC2 PostgreSQL
Another way is to connect from the local machine to the remote server by creating SSH tunnel. Using PuTTY, we can create the local port bridging to the remote server and then use the local pgAdmin to manage the server’s database.
PuTTY / SSH
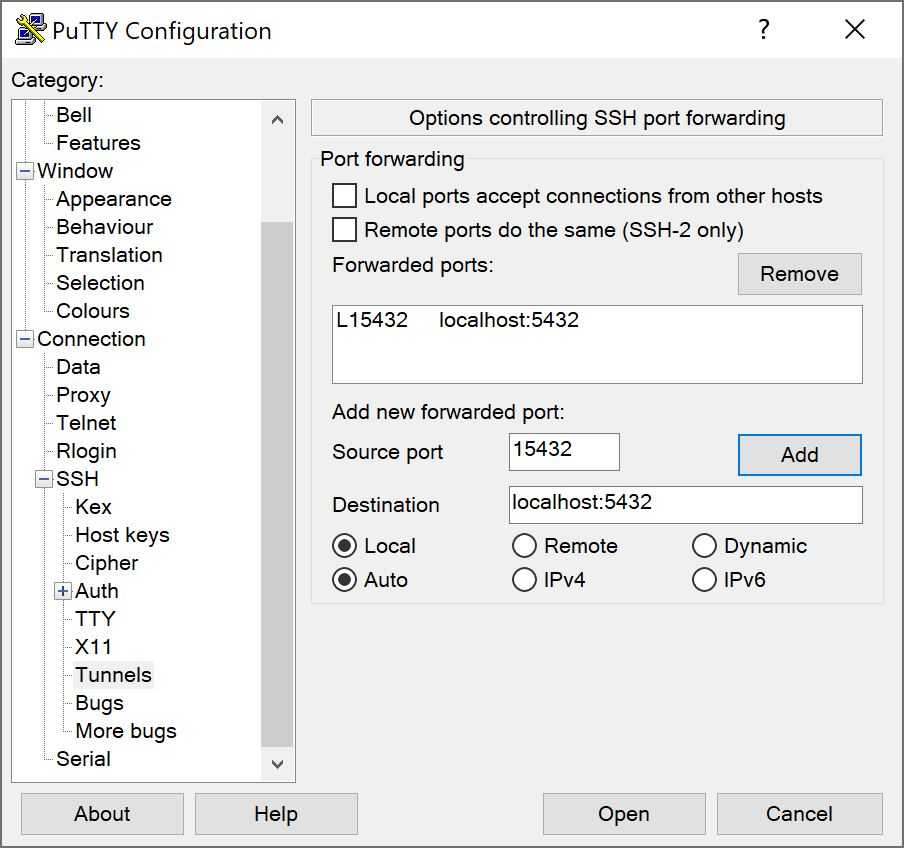
In PuTTY’s configuration screen go to:
Connection > SSH > Tunnels > Add new forwarded port:
For Source port enter 15432 (or any other available port in your local)
and for Destination enter localhost:5432 (if 5432 port is the PostgreSQL port defined on your remote server).
Click ADD and record will be added to Forwarded ports: list.
Make sure that settings below destination are local and auto.
Go back to PuTTY Session, load your server details and click Open.
pgAdmin 4 connecting from client to remote server
Now only left is to open pgAdmin (4) go to tree root Servers right click and choose:
Create > Server...
In the General tab choose name for the server connection MyRemoteEC2Server, choose group, and switch to Connection tab.
In Connection tab populate for:
- Host name/address: localhost
- Port: 15432 *(this is a “bridge” port we created earlier with PuTTY)
- Maintenance database: dbexample
- Username: exampleuser
- Password: ThatUs3rP@ssw0rd
Be careful with what user you connecting as it can have limited permissions, so from time to time, for a database backup and restore purposes you will need to connect with:
- Maintenance database: postgres
- Username: postgres
